The wiring a ceiling light Diaries
What're your beliefs about wiring a ceiling light with 2 wire?You'll commonly see us describe 2-wire and also 3-wire lights systems. This is an important point as many products, such as relays, can not work if installed into a 2-wire system.
This application note explains the distinction in between 2-wire and also 3-wire lighting systems as well as assists you recognize which variation you have in your installment.
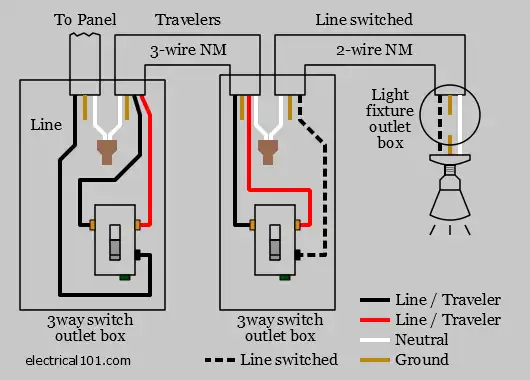
Firstly, what do we mean by 2-wire and also 3-wire systems. The simple description is that a 2-wire system does not consist of a Neutral wire at the light button, the 3-wire system does include the Neutral at the switch.

2-wire Lighting Solutions
This is the most typical lighting system in Europe, nearly all houses use this system, particularly in the UK and also Nordic regions.
The term is somewhat complex as the system will really consist of three cables. However, the 3rd cord, which usually has a green/yellow sleeve is the Earth cable. The Planet is a really integral part of the electrical system and all switches, home appliances and also lights should be properly earthed. But for the benefit of simplicity we ignore the Planet cord when describing wiring as it plays no active function in the day-to-day functions of your light circuits.
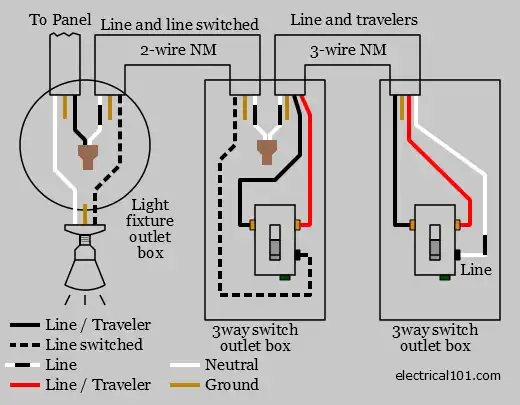
3-wire Lights Systems
The 3-wire system is less common than the 2-wire system, it includes a Neutral at the button along with the Live as well as Switched Live wires.
An example of a 3-wire illumination circuit is displayed in Figure 2. One '2-Core + Planet' cable television takes Live and also Neutral to the button back box, a second cord takes the Neutral as well as Switched Live to the light.
Note - the Neutral is not attached to the real button, the two Neutrals are connected with each other making use of a port block.
How do I understand which system I have?
As the 2-wire system is the most typical, it's possibly best to start with the assumption that you have a 2-wire system, specifically if you remain in the UK or if your home is more than 3-5 years of ages.
You can inspect the complying with factors:
• Are all the cables connected to the button?
• Do all the cables have a brownish sleeve on them?
• If the response is YES to either of these points, you have a 2-wire system
• Do you have two blue, black or grey wires mosting likely to a connector block? If so you MAY have a 3-wire system, but you need to validate this with a voltage meter or speak with a certified electrical expert.
A Word of Caution
Turn off the breaker managing the light and also follower circuit. This is the solitary crucial part of any house circuitry treatment. Also after turning off the breaker, it's still an excellent idea to utilize a voltage tester to evaluate the cable links prior to you work with them.
You'll Require to Make Pigtails
In electrical work, a pigtail is a collection of wires entwined along with a brief length of cable. The pigtail permits you to attach all the cords to a solitary terminal. The trick to making an efficient one is to turn the cords together clockwise-- not counterclockwise-- before screwing on the cap. By doing this, the clockwise threads of the cap make the connection tighter when you screw it on.
Transforming From Two Switches in the Same Box to One Change
Detach the two black wires from both switches. If you don't know which one products power per switch, transform the power back on and also evaluate the cables by linking each to ground with your voltage tester. The online circuit cables will certainly offer you an analysis as well as the others will not. Transform the breaker back off when you know which is which.
Make a pigtail with the two live wires and a brief length of black wire of the same scale. Link the short wire to the leading terminal of the button you intend to make use of. Do the exact same with both various other cables, and link them down terminal of the switch.
Unscrew the cap from both white cords offering the button you're no longer using, add a brief size of white wire of the exact same gauge and also screw the cap back on make a pigtail. You might need a bigger cap than the one that got on there. Interlace the other end of the short wire to both white cables serving the brand-new button. If you want, you can also merely splice all 4 white wires with each other under the very same cap, yet you might find that difficult to do with four wires.
Get rid of the ground from the out-of-service switch and the one from the button you're utilizing. Link them by turning them together or using a kink ring, then connect them to the eco-friendly ground terminal on the button you're using.
Linking a Light and Follower to a New Change
Situate the switch wire, which should be sticking with the leading or side of package serving the follower or light. Utilizing wire pole dancers, strip an inch of insulation from completion of the black and white wires. Mate the black cable from the follower along with the black cord from the light as well as the black cord from the switch, and also cap them. Connect the white cables with each other in the same way, then repeat with the ground cables. When you splice ground cords, you don't need to cap them, however it's still an excellent concept to do so because the cap helps maintain them together. Mount the fan and also light and also transfer to the button box.
Link the black cable from the fan down terminal of the button as well as the real-time circuit cord to the leading terminal. Entwine the white wires together and cap them. Twist the ground cables together and link them to the eco-friendly ground screw on the switch.
I hope you enjoyed reading our part on wiring a pendant light. Thanks so much for taking a few minutes to browse our posting. So long as you appreciated our post please make sure you remember to share it. Thanks so much for going through it.
You are going to then have to have to decide on an ideal position to the light change. This is usually on the wall near to the doorway towards the area.
Whilst straightforward to diagnose, bulb burnout is not the only probable trouble. Bulbs could be improperly sized, far too potent, or simply just normally defective. An sick-fitting bulb will probably be challenging to fit in the socket. Whoever installed this bulb might have had a really tough time doing this. It is feasible to realize success occasionally, although the bulb will not operate properly from the beginning. A bulb of the wrong dimension would not perform effectively since it would not be connected to the socket thoroughly to permit to the wanted electric power stream. A bulb that exceeds the socket’s wattage Restrict is not going to burn off or will likely not burn up brightly since the electricity provide is just too low.
You'll now need to transfer your wires to at least one aspect from the electrical box. From right here you can mount the crossbar on the electrical box.
Take away the washer from Within the canopy and pull the excess wire out with the light fixture. Discard or help you save the surplus chain and wiring for an additional undertaking.
Local store price ranges may well vary from those exhibited. Items shown as obtainable are Typically stocked but inventory levels can't be certain
Wiring your ceiling fan and lover light these which the two might be managed independently has a major advantage which has to perform with the reduction of ability use. Here's the way it performs out…
Prevent looking to place your ceiling fixture collectively after you install it. You should take some time to assemble the pieces together after which you can place it up as a single unit. Creative Commons new ceiling admirers 002 by Roger Mommaerts/ CC by 2.0
You may argue that a razor or knife could possibly get The work carried out. We agree. Having said that, the stripper will get the job in the neater and quicker way.
Exterior destruction is obvious but inside destruction would need a additional comprehensive evaluation, employing a multimeter as described in the subsequent movie:
This will avert any damage or shock. Then, simply pull on Each individual pull chain to test whether it is unfastened or broken. In that case, consult How to interchange a Pull Chain on the Ceiling Supporter For additional in depth Guidance on how to resolve it. Otherwise, move on to other methods in order to troubleshoot more.
Ahead of we soar into the actual approach, below’s a thing fascinating. This wiring can be done in two methods. You'll be able to install the ceiling admirer and light wired to two separate switches.
Remote control ceiling supporters with lights might be unbelievably handy and easy. Whenever your enthusiast works and the light doesn’t, nevertheless, these lovers might cause some frustration.
It’s greater to operate on these wires with palms which have been freed from the rest – similar to a ceiling fixture.
Below jumping signifies Keeping the wire’s small space and striping insulation from it. To go now be able to conveniently loop it across the warm terminal.